Sharing
AnyDB is designed for powerful, flexible collaboration. Whether you're working with internal team members, external stakeholders, or public audiences, sharing items and views in AnyDB is easy and secure.
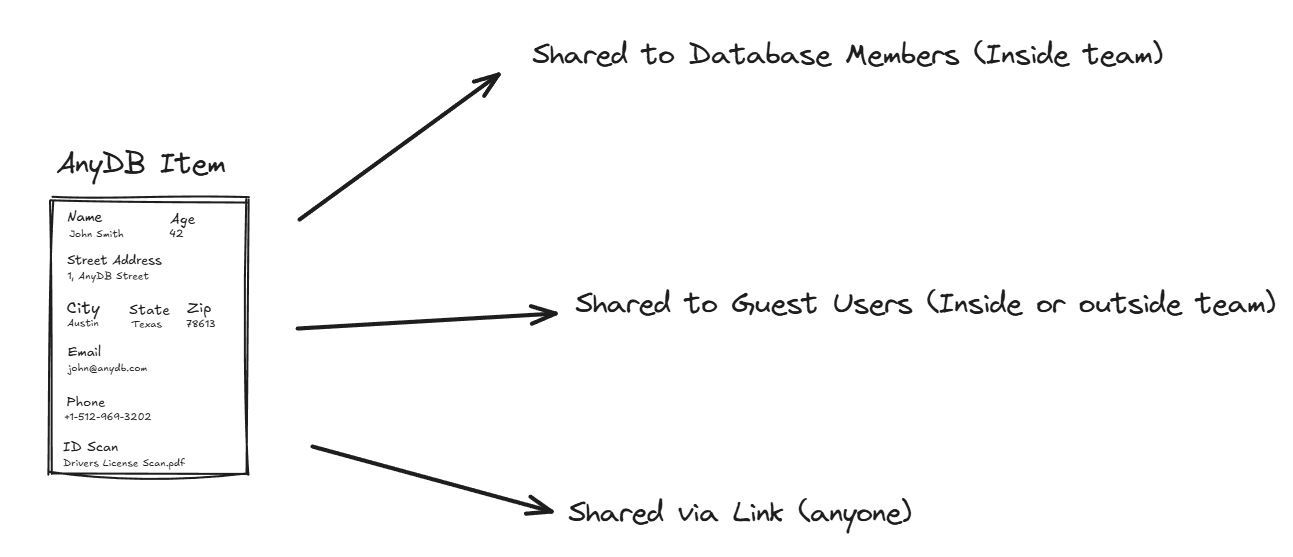
You can share any item or view using one of the following methods:
- Database Sharing (team members)
- Guest Sharing (external guests via email)
- Public Sharing (via link)
- Shared Views (share a filtered view of selected records for team members or guests)
What Can Be Shared
- Records
- Pages
- Files
- Folders
- Saved Views
Ways to Share Items and Views
Database Sharing (Internal Members)
Team members gain access by being added to the database that contains the item. This gives them structured access to all records and documents inside that database.
- Roles control access (Viewer, Editor, Admin)
- Team members count toward your licensed user limit
- Users browse the database to access items they have permission to see
Guest Sharing (External Guests via Email)
Share an individual item with an external user by inviting them via email. These external users are called Guest Users.
- Guests must log in
- The shared item appears under Shared with Me
- Assign Viewer or Editor
- Optional access to Attachments (child items)
- Guests do not consume licenses
Guests only see the specific items you shared with them.
Public Sharing via Link
Create a link that anyone can open without logging in.
- Choose Viewer or Editor
- Allow or block attachments
- Disable the link at any time
Public links are unlimited on all plans.
How to Share an Item
To share a Record, Page or File:
- Open the item inside AnyDB
- Click Sharing & Forms
- Select Share Document

The Sharing dialog includes three sections.
Team Members with Access
- Shows database members who have access
- You can override access levels for this item
- Overrides apply only to this item and its children
- To add someone new, edit the database’s member list
Guests with Access
- Enter an email or group name to invite
- Assign Viewer or Editor
- Allow or block attachment access
Attachments include files or child pages associated with the shared item.
Guest users may also be team members if you want to give selective access to only certain items.
Public Access
- Toggle to enable or disable a public link
- Copy the link
- Choose Viewer or Editor
- Allow or block attachments
Public access can be revoked at any time.
Shared Views
You can share Saved Views directly with internal team members or external guests. This allows you to create focused portals that expose only the filtered, sorted or grouped data shown in the view.
Examples:
- A Guest Portal showing a customer only their active work orders
- A Team View showing reps only this week’s leads
- A Contractor Portal showing assigned tasks and documents
How to Share a View
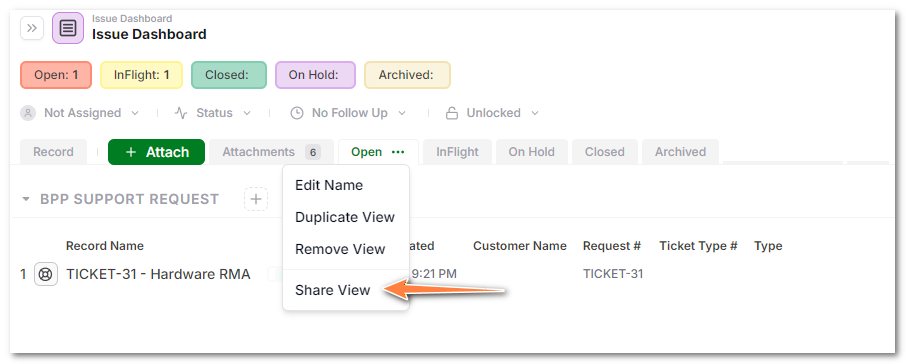
- Create or open a Saved View
- Open the View Options menu
- Click Share View
- Choose how to share:
- Share with Team Members
- Invite Guests
You can manage or revoke access from the same Share View panel.
To Edit a Shared View, open the view and click View Options > Edit Shared View.
To Remove a Shared View, open the view and click View Options > Edit Shared View and then click on Stop Sharing button at the bottom.
Note that creating a shared view saves the filter and settings when it is created. Once the share is created, further changes to the conditions or settings are not proppagated to the share, unless you remove the share and recreate it.
Note #1: When the view is removed, the share is also removed.
Note #2: Attachments option is always required when creating a shared view
Note #3: Shared Views cannot be shared via Public Link, it requires either guest access or a team member to login into AnyDB.
Shared Views respect all existing permissions:
- Guests only see records included in the view
- You control Viewer or Editor access
Shared Views are ideal when you want to expose structured slices of data without giving access to the full database.
Share Expiration
You can set a time-based expiration for any share.
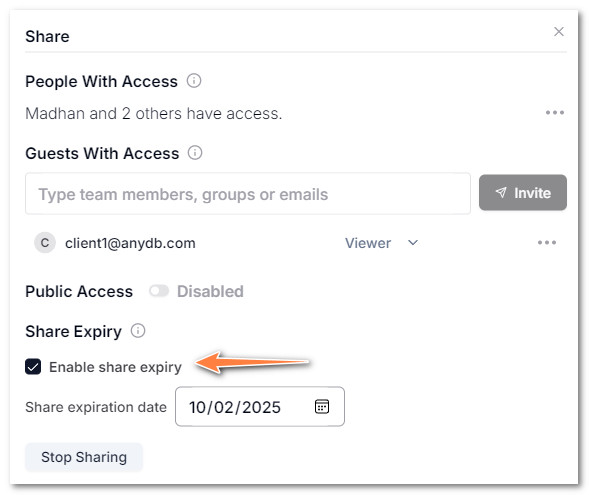
- Enable expiration
- Select a date
- The share automatically becomes inactive when the date passes
Best Practices
- Use Shared Views as controlled portals for teams or guests
- Use Database Sharing for collaborators who need full access and item creation rights
- Use Guest Sharing for clients, reviewers or contractors
- Use Public Links for easy distribution and frictionless viewing
Summary
| Share Method | Requires Login | Can Create Items In Share | Requires License | Attachments Support | Recommended For |
|---|---|---|---|---|---|
| Database Sharing to Team Member | Yes | Yes | Yes | Yes | Internal teams needing full access |
| Guest User (Portal) | Yes | No | No | Yes | External viewers or editors |
| Public Link | No | No | No | Yes | Broad viewing or lightweight collaboration |
| Shared View (Portal) | Yes | No | No for guests | Yes | Portals and focused data access |